This project will combine all that you've done for your projects, but integrate and add on to them, making use of topics we've covered during the last month of the semester. Most importantly, you have the freedom to create this application however you want.
I have not listed URL's specifically. The requirement is that your application is easy to use - which is subjective! Users should easily understand how to login, logout, view the main contact page, and make edits. How you accomplish this is up to you - but think consistency instead of creativity. People use application like this all the time - your application should feel familiar.
You need to realize that your choices on how to do things in, for instance, Part 2, will influence how you can approach things in later parts - like Part 4. Make good decisions. The parts have been sequenced in the order that I would recommend doing the work.
For all parts of this assignment, you are expected to use Node.js on the server and standard HTML/CSS/JS on the client. While it’s not required, you may find it easier to use the Express web framework to do your server-side code. In addition, while you are free to use EJS for template rendering, you might also consider Pug. It is completely your choice (and your responsibility) to make these types of choices.
In many ways, this Final Project is a chance to do your projects a second time, this time knowing (hopefully!) more, and being in the position to do things in a better way. It’s a chance to apply lessons learned. I recommend you start from scratch, rather than falling into the same exact sequence as before - but using your previous work as a guide.
The final project is worth 100 points. The breakdown is as follows. There are 10 available extra credit points as well.
| Part 1 | Persistent Contact List | 10 Points |
| Part 2 | Location (Lat/Long) for Contacts | 10 Points |
| Part 3 | Mapping Contacts | 10 Points |
| Part 4 | Contact CRUD | 10 Points |
| Part 5 | Securing the Contacts page | 10 Points |
| Part 6 | Make it look nice with CSS | 10 Points |
| Part 7 | Deploy to Render.com | 30 Points |
| Part 8 | Overall ease of use | 10 Points |
| Part 9 | Name Search Fields | +5 Points |
| Part 10 | Location-Based Search | +5 Points |
Any user may create a contact - whether they are logged in or not - just like in Project 2. Each contact should have the following attributes:
The home page (/) should display the contact list page, as a tabular structure (note, you do not need to use an actual HTML table, and if you are making the page responsive to mobile devices, you may not want to!). There should be a clear way for users to add new contacts, and then return back to the home page.
When a contact is added, you must geolocate the address using techniques similar, or exactly, as you used in Project 4. You must store the latitude and longitude for each contact. You should handle errors (failed address lookups) in a way that allows the user to understand clearly that the address could not be found. Again, you are in control of how you handle things - but you will be graded on how nicely you've done this! Latitude / Longitude should be displayed in the contact list if you do not do Part 3 successfully - otherwise you will not recieve credit for geolocation without successfully implementing the map!
When the contact list page is visited, the top half of the page should be the familiar table of contact information. However, below the table should now include a map, with each contact plotted as a marker on the map. The map should be interactive - in that when a user clicks on a contact in the contact table, the map should automatically move to the contact's location.
Model this section off of the requirements from Project 4, including markers and map functionality.
Next to each contact on the contact table, you should have a link to Update the Contact. This should take the user to a new page , but with the form elements already pre-populated. The user can edit the values, and click save. Be sure that the contact is simply updated - not that a new one is added.
Similarly, next to each contact there should be a delete button. Clicking on this should confirm that the contact should be deleted, and then do so - returning the user back to the main page.
This section is essentially the same set of requirements from Project 2 and 3. You may implement it using any of the types of architectures we've covered (entirely pug-based server side rendering, a mix of server side with Vue, or as part of a complete Vue app).
In Project 2 you were required to implement a login, logout, signup workflow. You were also asked to make sure that only authenticated users could edit and delete contacts. The same set of requirements hold for this application. You will not receive credit for this part unless you properly store hashed passwords in the database. Note, the user interface must be easy to use (see Part 8) and look professional, including when attempting to access functionality that an unauthenticated user is not allowed to access. I strongly recommend that you remove edit and delete links during unauthenticated sessions!
Similar to Project 3, you are expected to use CSS in a manner to create a consistent, professional and responsive visual representation. No points will be awarded for special tricks that do not add actual value - but good use of color, borders, spacing, shading can enhance the ability of a user to quickly work with the site and are encouraged!
This is the major new part of this project. Before reviewing all of these instructions (carefully!), please keep the following in mind: The time to deploy is NOT when you are done with the coding. The time to deploy to your domain name is when you have a minimally functioning site - even just a landing page. If you follow these directions, it will feel complicated the first time you set everything up - but updating your site will be easy. You can deploy updates throughout the development process. DO NOT WAIT TO DO THIS PART UNTIL YOU ARE UP AGAINST A TIME CRUNCH!!!
Domain names can be purchased for low cost, and if you don't want to renew, will simply expire. The following documentation uses Namecheap.com, just because I generally find it very easy to work with. You can use any domain provider, however your steps for getting it to work with render.com (see below) may be different.
Your first step will be to create an account with namecheap.com.
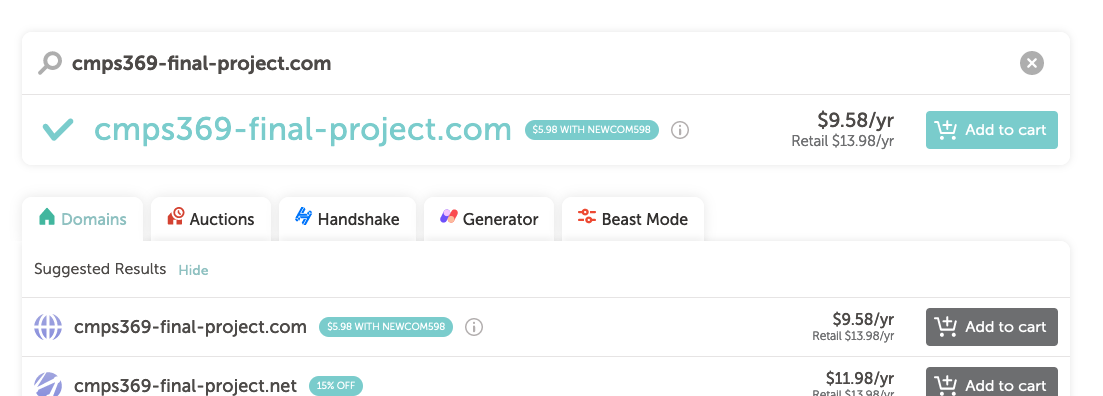
You will need a credit card for purchasing your domain name. Less common top level domains (like .website instead of .com) tend to be really inexpensive, I registered this site for 98 cents per year.
Once you've identified the web site you want, add it to your cart. Namecheap will ask you if you want a bunch more add-ons - You do not need ANY of them. We will create our own SSL with render.com for free, and all the rest are not relevant for a simple site like this.
Checkout, and complete your purchase. Unless you plan to keep the domain active, make sure you de-select the auto-renew option. You can always renew it later if you want to keep it. Domain privacy is free, and is up to you. You do not need Premium DNS or any other offer.
Once you've purchased the domain name, you will be brought to a page that lists "Domain Registration" and it will have a manage button.
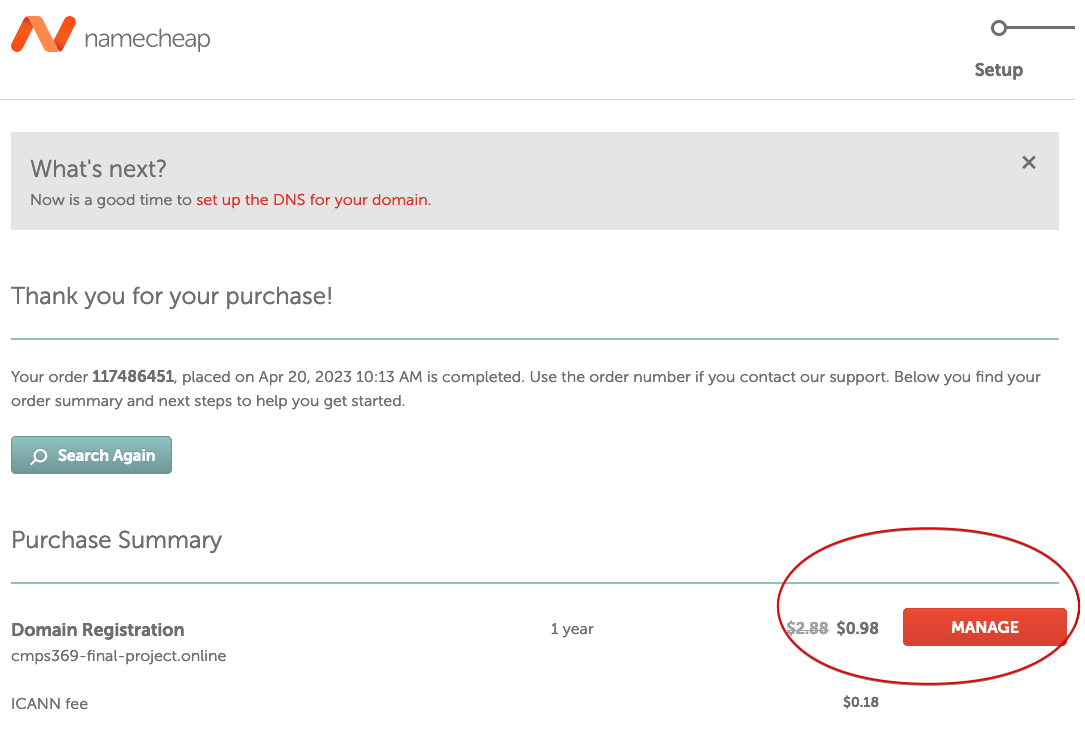
Click the "Manage" button, and you will be taken to the site configuration page. We will pause here, but will return to this once render.com is ready to serve your application.
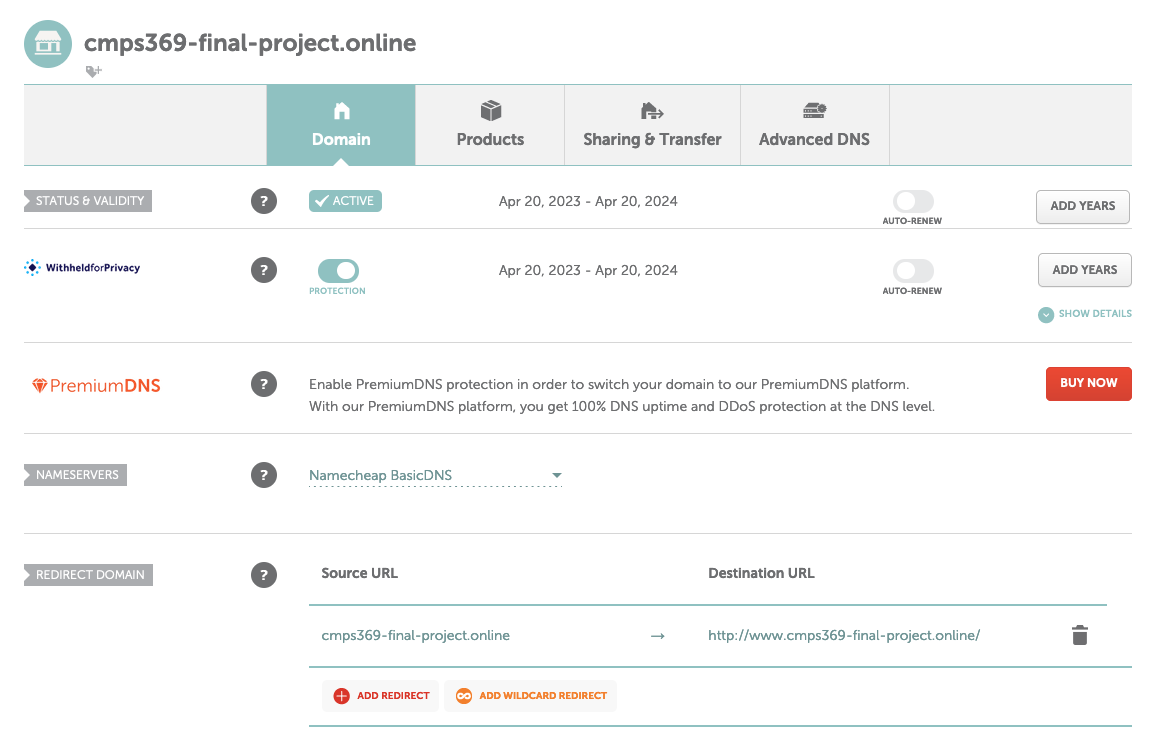
Namecheap is just a domain service - it allows you to route internet traffic destined to your web page via the domain name to an actual IP address. The machine at the IP address is where your application runs. We will deploy our application to render.com, and once we have it running, we will come back to namecheap and configure network traffic to redirect to our appliction.
Step one is to create an account on Render.com. It is free (although some features require payment).
Once you've signed in, navigate to the main dashboard, and click "New +".
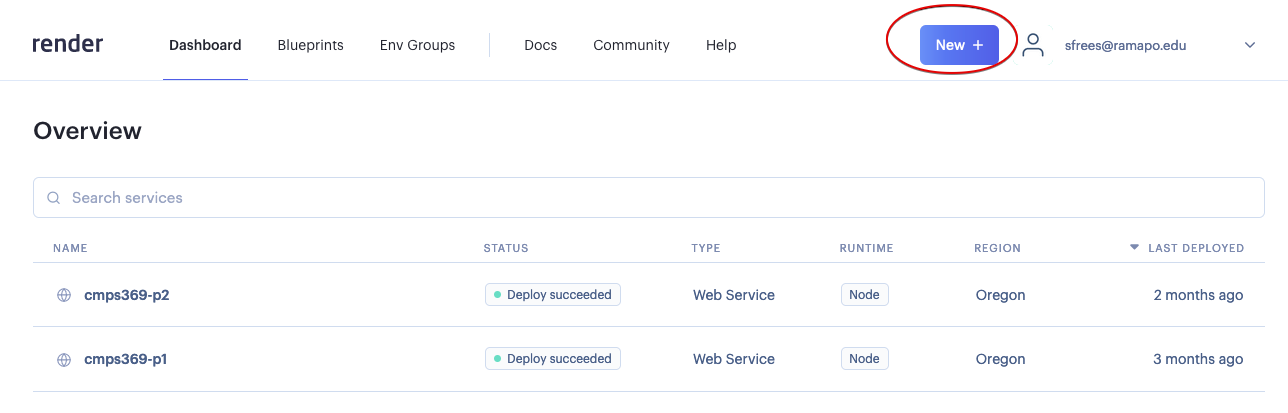
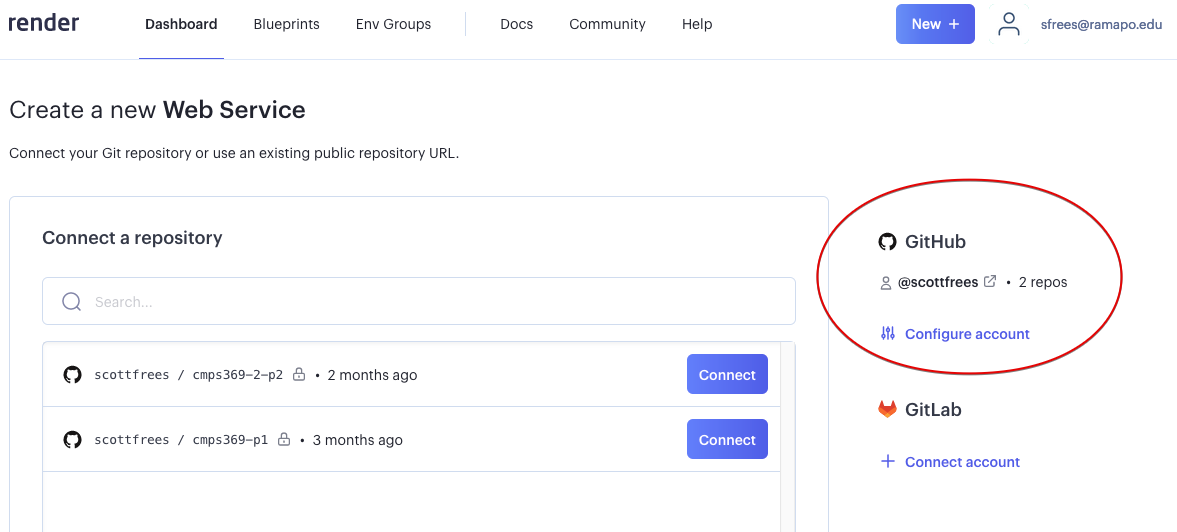
Create a WEB SERVICE. You will be directed to a page that is set up to deploy a new web application. At the right, you will see Github - but at this point you are unlikely to have a github repository to link render to - so pause here and let's set that up too.
If you are completely new to git, please pay VERY carefull attention to these instructions. Head over to github and create a new account. Accounts and repositories are free.
Git is a version control system. It allows you to keep track of changes to your code, and to easily roll back to previous versions. It also allows you to collaborate with other developers on the same code base. It is a very powerful tool, and is used by many large companies. It is also a very common tool for developers to use when applying for jobs. If you are not familiar with git, I strongly recommend you take the time to learn it. It is a very powerful tool, and will make your life easier as a developer.
Github is a web site that hosts git repositories. It is a very common place for developers to store their code, and to collaborate with other developers. It is also a very common place for developers to store their code when applying for jobs.
A repository is a collection of files that are tracked by git. It is a very common practice to have a repository for each application you are working on. You can have multiple repositories on your computer.
Open your terminal/command line on your own machine, and navigate into the directory where your application is.
Type git in the terminal. If there is an error, you will need to install git - otherwise you should just see some documentation print out.
Type git init to initialize a new git repository in the current directory. You should see a new directory called .git appear in your directory.
Create a new file in this current directory (top level directory) with the name
.gitignore. The name is important - it starts with a period. Inside this file, put the following text:
node_modules
package-lock.json
.env
*.log
*.gz
This file will instruct git to ignore those files and folders, which ordinarily do not get added to source control.
Type git add . to add all files in the current directory to the git repository. You can also add individual files with git add filename.
Type git commit -m "Initial commit" to commit your changes to the repository. You can also use git commit to open up a text editor to write a longer commit message. If you have not yet used git on your computer, you may be prompted to enter your contact information - follow the directions carefully. This contact information is not made public, it is embedded within the git repository itself.
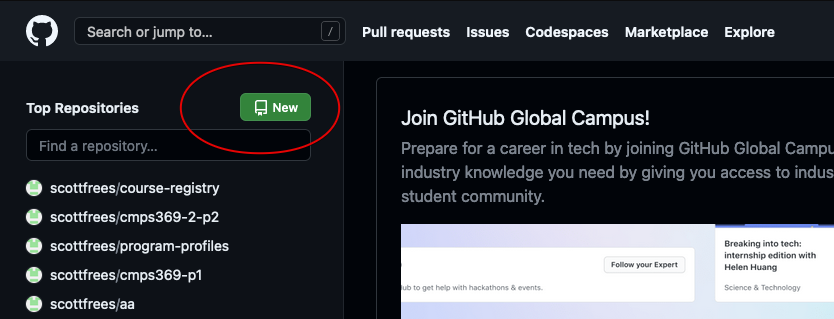
Now return to github, and we will create a new repository so we can add our application. Press the "New" button:
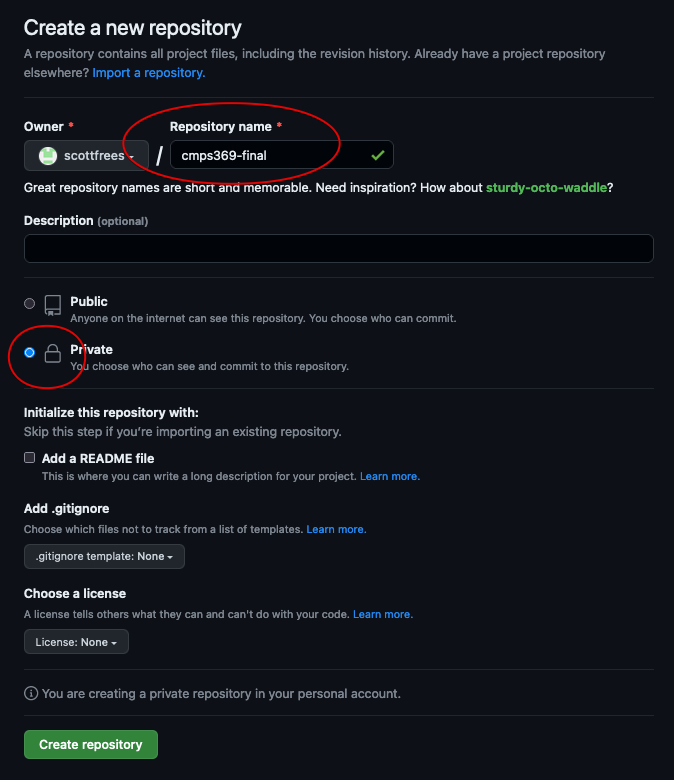
Create a new private repository, without any other options - since you have an existing project already.
After creation, you should see the following screen, we'll need the circled part for adding github to your local repository.
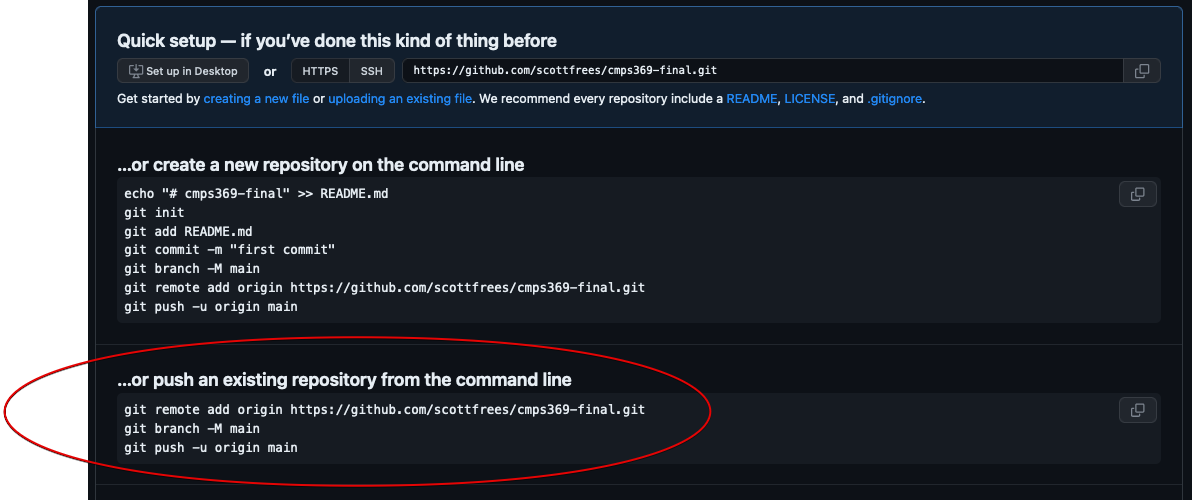
Now, go back to your terminal, in the directory of your application. You should have already done your git commit. Execute the
git remote add originexactly as specified in the github instructions. You should see a message that the remote was added successfully. Now, execute
git push -u origin master [your repository]. You should see a message that the push was successful. You can now go back to github and see your code. Note use master, not main - since that is the default that was created earlier
Go back to github.com, and you should be able to see the new project in your account, with the code.

Now we are ready to return to render.com and get your application set up. Go back to the render.com dashboard and click the button to connect to github.
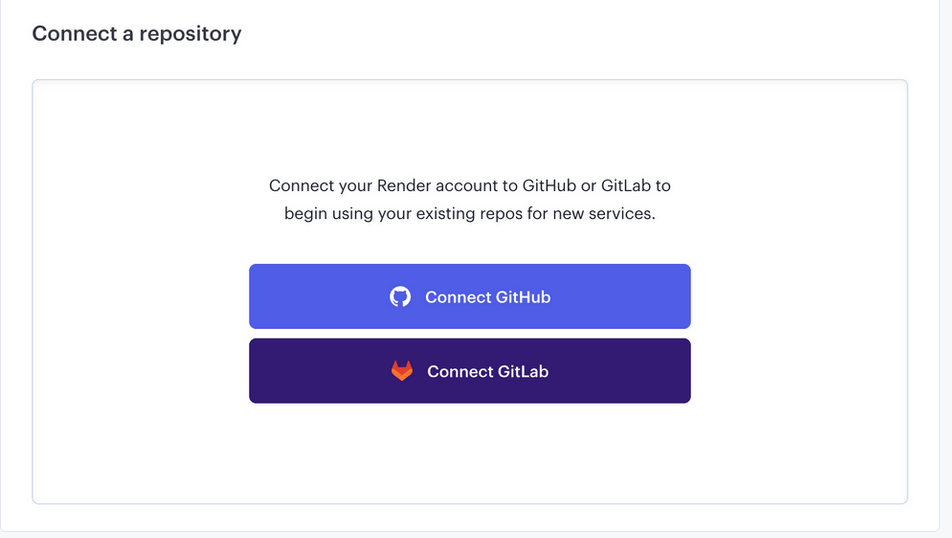
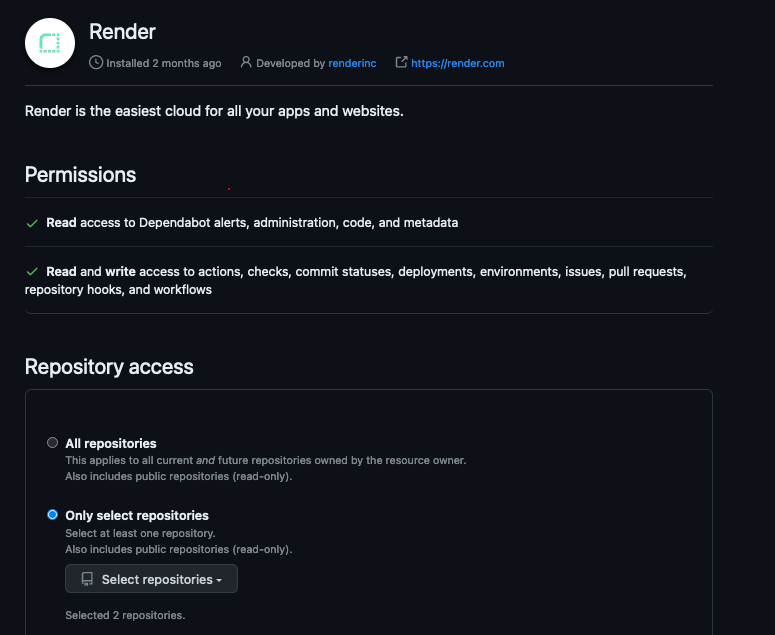
You will be prompted to enter your account credentials. Then, either choose to grant render.com access to all of your repositories, or just your repository for this project.
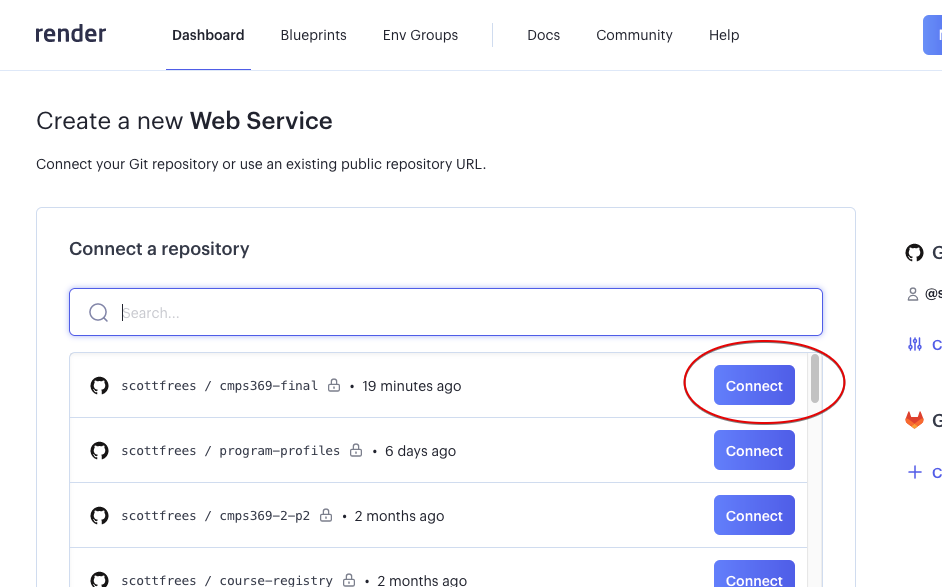
Click save and you will return to render.com. At this point, you will have a list of repositories to choose from - select your project and click "connect".
You will be asked to create a name (choose something similar to your project name), region (US West is default, and is fine), and branch (should be master). The runtime should be Node. The start command is IMPORTANT:
npm start, then enter that here. node server.js .Choose the Free plan and click CREATE WEB SERVICE
At this point your application will be fetched from github and deployed. It may take a few minutes, you will see the project building:
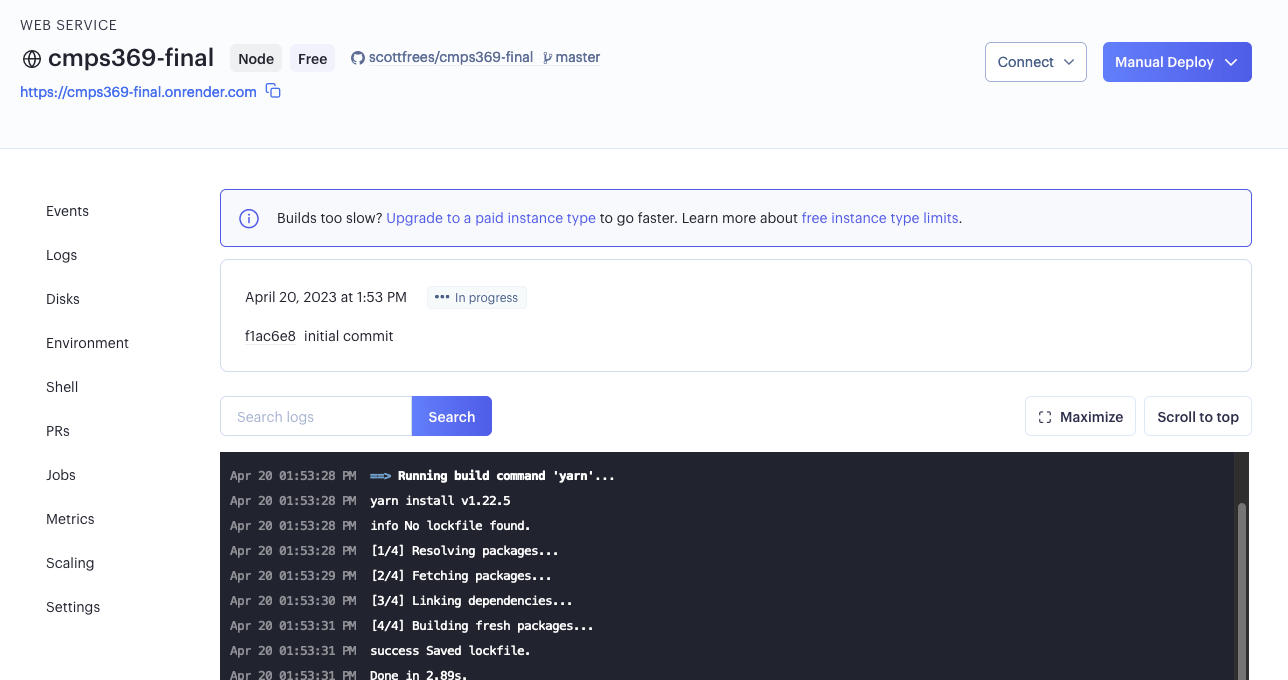
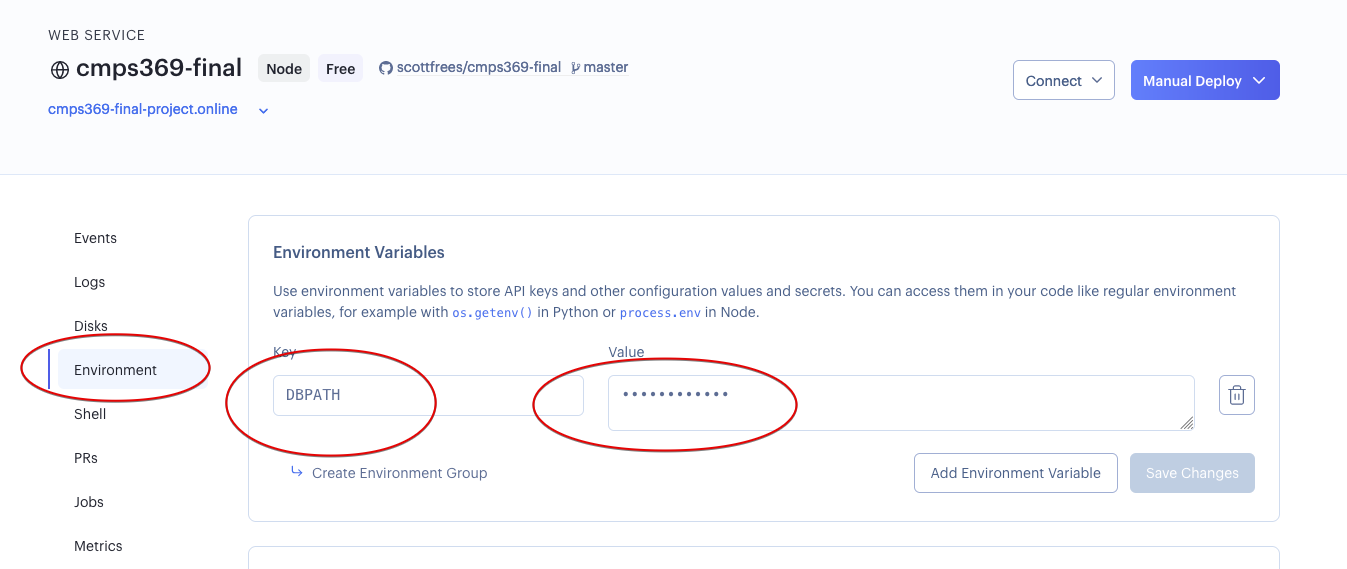
You will likely see an error message on render.com's dashboard, saying your build failed. This is because you do not have a .env file in your repository (and you shouldn't). To set the DBBATH, you can set an environment variable with render.com's interface. Happily, your code will use this automatically!
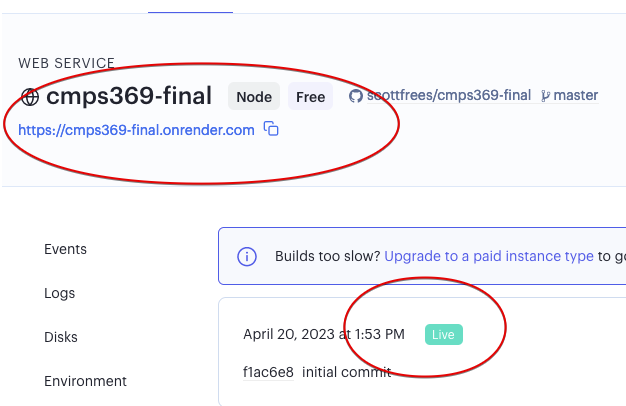
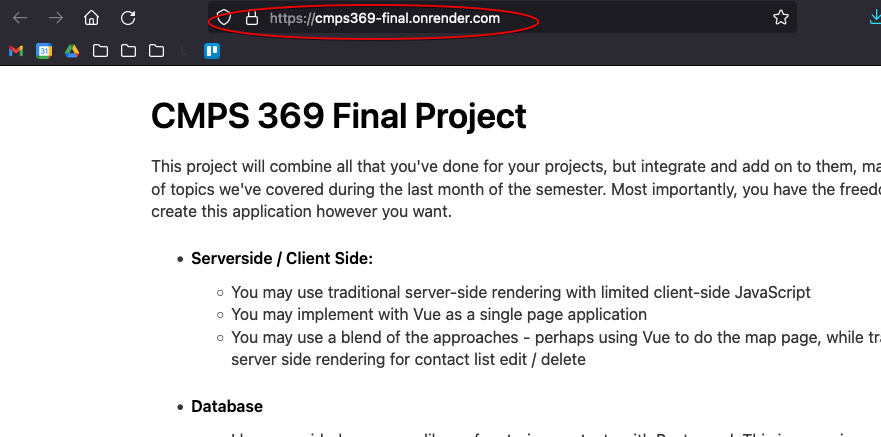
After a little while, you will see that the application is deployed, and you will be given a URL to access it. Click the link to open your application in a new tab. You should see your application running!
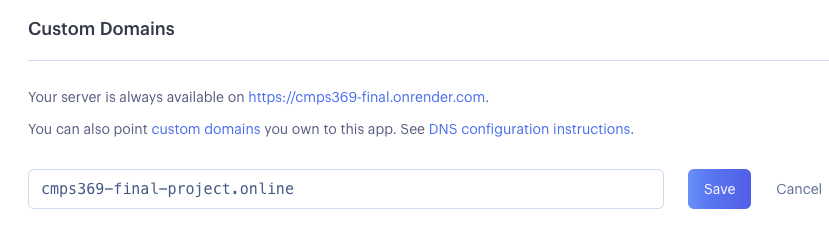
If you've made it this far, you are almost done! The last step is to point your domain name to your render application. From Render's dashboard for your app, scroll down to the Settings pane, and find the Custom Domains section.
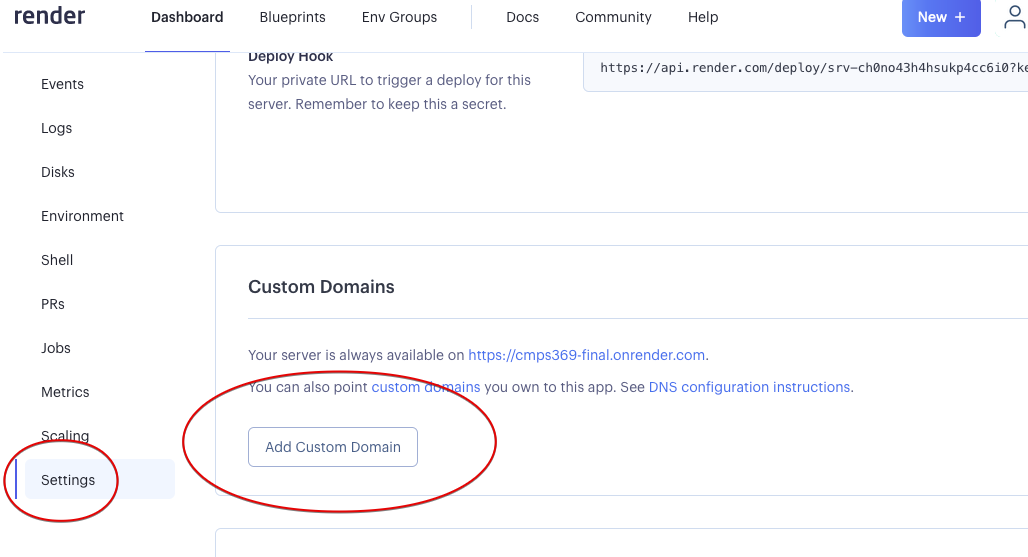
Enter the domain name that your registered with Namecheap and click "Save"
You will now need to add additional configuration parameters to Namecheap. The render dashboard tells you exactly what to do!

A CNAME is a DNS record that tells the DNS server to redirect traffic to another domain. In this case, we are telling the DNS server to redirect traffic for our domain to the render.com domain. This is necessary because render.com is a hosting service, and they need to be able to route traffic to your application. They do this by using a CNAME record. You can read more about CNAME records here: https://en.wikipedia.org/wiki/CNAME_record
An A record is very similar to a CNAME record, however it redirects all types of traffic to an IP address, specifically. Think of CNAMES as aliases for domain names themselves, and A records as instructing the DNS server to redirect traffic to a specific IP address. You can read more about A records here: https://en.wikipedia.org/wiki/A_record
Go back to namecheap.com and access the Advanced DNS page for your domain:
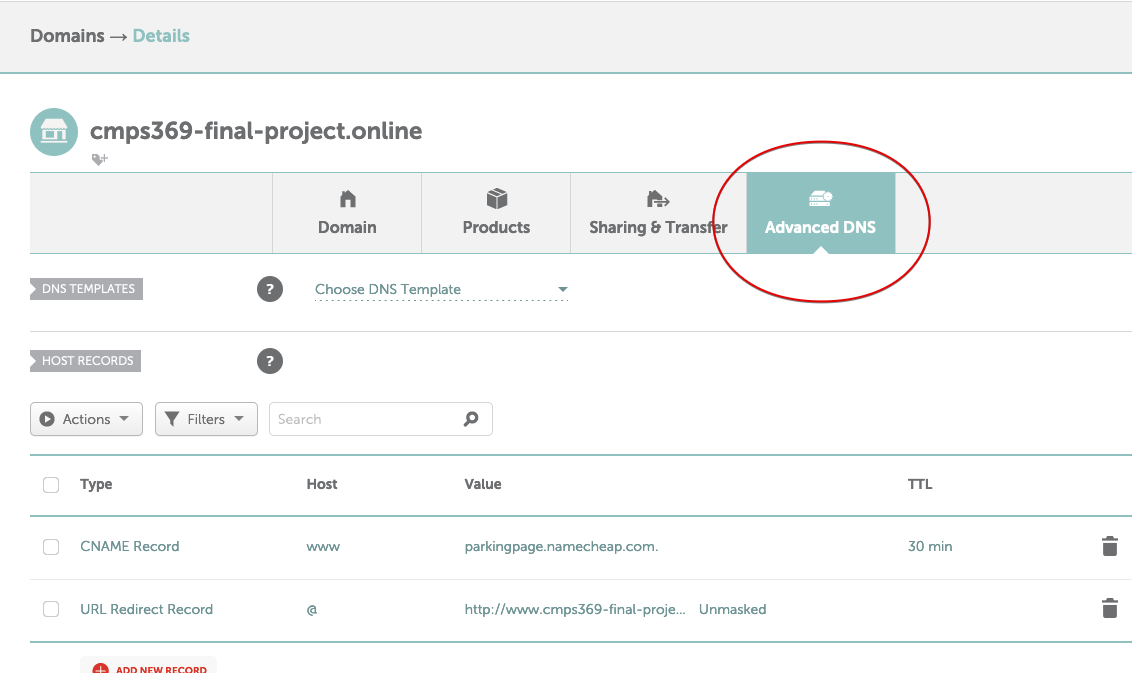
DELETE the parkingpage.namecheap.com CNAME Record.
Add a new CNAME record exactly as the render.com page tells you to (you need to use the ***onrender.com URL your app is running on).
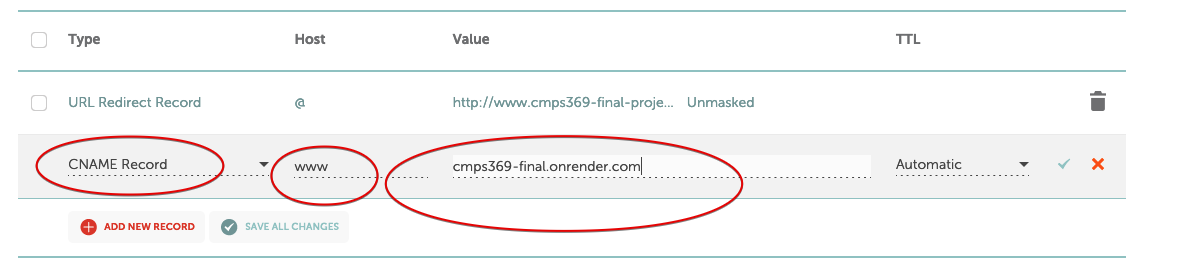
Next add an A Record.

Click SAVE ALL CHANGES
Wait a few minutes. Then return to render.com and click "Verify" next to the CNAME Instructions.
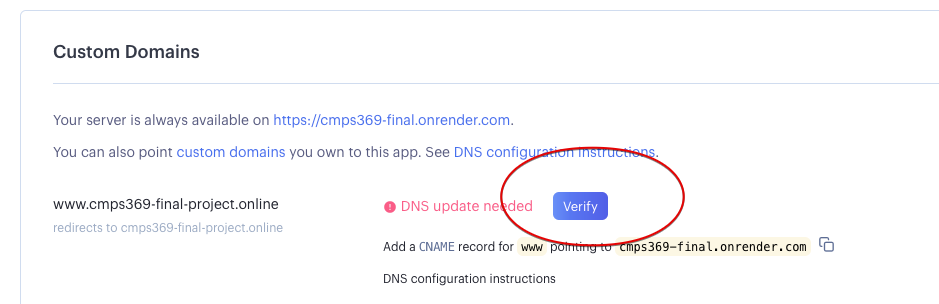
After clicking verify, also click verify for the ALIAS record (even though you have not created it). You should see "Certificate Pending" next to each.
Click here for more information on configuring Namecheap DNS.This can take several hours to resolve, so be patient. It takes a while because the CNAME and A Records you've entered need to propogate through the internet, reaching the DNS services that your own machine may route through before the site is reachable. Eventially, you should be able to access your website through your domain name (http:// or https:// and with and without www prefix).
The page you are reading right now is hosted on render.com, and is actually an express/pug application serving just this one page.
Subjectively, the application should be user-friendly. Things that I am looking for:
The name of the game for this part is - "Does the application look like applications you use every day?". While I'm happy to answer questions, you are a consumer of web applications every day - you know what a professional web site looks like! Use your judgement, weighing design with your time budget.
At the top of the contacts page, add search fields for First Name and Last Name. When the user types values, the contact table should be automatically filtered to display only contacts whose first name/last name includes the text written in the search field. They do not need to be perfect matches - if there is a contact named “Abigail”, then typing “Ab” into the First name search box would allow her to be shown in the results.
Add a search field to the /contacts page where a user can type in an address. Add drop down so the user can select the search radius - 5 miles, 10 miles, 25 miles should be the three choices. When the user sets the address in the search field - you need to geocode the address to obtain its latitude and longitude. Then, update the contact page to only show contacts who are within the given search radius. Also re-center the map to the search address. You can convert distances between latitude and longitude using the following reference - or you might be able to find other ways - it's up to you!
https://www.geodatasource.com/developers/javascript
Here's the best part... if you've followed all the steps below, your app will automatically update on render.com if you do the following:
git commit -m "some message" to commit your changes to your local repository.git push origin master to push your changes to github.Remember at the beginning of this page, you were told to deploy to render.com early? Hopefully you did - because from now on, any time you improve your application it gets deployed in two simple commands and is ready to go!
You will need to submit the following: